How To Use The LCD Console On Your Electric Bike
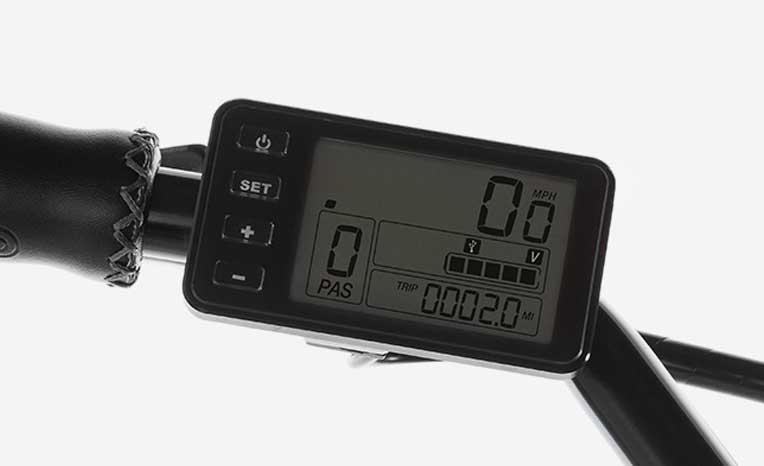
Pedego electric bikes are equipped with an LCD console that monitors your pedal assist level, speed, odometer, trip distance, riding time, and battery energy level. If you have purchased your electric bicycle from a Pedego dealer or via the official Pedego website, your ebike will arrive with all the correct LCD console settings, such as km/hr settings and a maximum motor speed of 32 km/hr. In this article, we list the different numbers and symbols, what they mean, and how to change certain settings on your electric bike.
It’s easy to turn the LCD console on. First, make sure the battery is fully inserted and the on/off switch is in the on or [I] position. Then press the power button (top button) on the four button selector located near the left grip on the handlebars. To turn off the LCD screen completely, press and hold the power button for three seconds. The console will also automatically turn off after five minutes of bike inactivity.
When the main screen first comes on, you’ll see five different things. In the top left corner there’s one horizontal bar – this fluctuates up and down while you ride and shows the amount of energy being drawn from the battery at any given moment. While resting, though, this area of the screen only shows one bar. The other things you’ll see are the speedometer (top right corner), the battery indicator, the pedal assist number on the left and, depending on your setting, you’ll either see the odometer counter indicted by “ODO,” the trip odometer (“TRIP”) or riding time indicator (“TIME”). To scroll between these three values press the “SET” button while in the main screen. This is what each indicates:
- Speedometer: Shows the current speed at which you’re travelling.
- Battery Level: This shows the battery’s level of charge. As this can fluctuate somewhat while riding, it’s best to let the bike rest for 30 seconds to get an accurate reading of how much power is left in the battery.
- Odometer: The total number of kilometres you’ve ridden on the electric bike.
- Trip Odometer: The number of kilometres you’ve ridden on the electric bike since the counter was last reset.
- Ride Time Indicator: The number of minutes you’ve ridden your electric bike since the LCD was powered on.
- Battery Output Level: As mentioned above, these are the bars in the top left corner that fluctuate while you ride depending on how much energy is being drawn from the battery.
- Pedal Assist Number: The large number on the left of your screen. The higher the number, the more energy the motor is exerting to propel you forward while you pedal. On most Pedego bikes there are 6 levels of pedal assist. In Level 0 the motor will not be activated by either throttle or pedal assist for most Pedegos. Levels 1-5 give you increasing levels of power (and top motor-assisted speed) while pedalling. Note that in these levels, the throttle acts as an override and can be activated to increase the power temporarily up to the maximum km/hr speed as required. Level 6 is a throttle-only setting and pedalling does not activate the motor. Pedal assist power can be adjusted while riding: simply hit the plus [+] button to increase power or the minus [-] button to decrease the amount of power the electric motor is applying to the wheel when you are pedalling.
To turn on the screen’s backlight as well as the integrated front and rear lights on your Pedego, once the LCD screen is on, simply press the power button and the lights will come on. Press it once again to turn them off. (Pressing the power button for longer than three seconds will turn the entire LCD unit off.)
There are other functions your LCD console can perform. By pressing and holding the “SET” button for a couple of seconds, located just below the power button, you’ll enter the programming menus. Here are the explanations for each screen and how they function.
Set 1 – Trip Odometer
After you’ve powered on the LCD screen, hold the “SET” button for two seconds. The screen will become backlit and you can release the button. You’ll see the number 1 in the bottom left corner. You’ll also see the trip odometer figure and here is where you can reset it back to zero by simply pressing the minus [-] button. This is useful to determine how long a particular ride is or how much battery power is used over a particular distance. To reset the trip odometer to zero, hold “SET” again for two seconds to exit the setup interface.
Set 2 – Maximum Speed
After pressing power, hold the “SET” button for two seconds until the screen is backlit (release at this point). Press the set button once again and you’ll see a number 2 in the bottom left corner. This is the maximum speed screen and the number you see should be 32. This means the maximum output the electric motor will do is 32 km/hr. It is the law in Canada that electric bicycle motor outputs cannot exceed 32 km/hr. If you would like to lower this maximum speed, press the minus [-] button until the desired speed appears. Hold “SET” again for two seconds to exit the setup interface.
Set 3 – Wheel Size
This should have been set when you purchased the bike. After powering on the LCD screen, hold the “SET” button for two seconds. The screen will become backlit (release the button at this point) and you’ll see the number 1 in the bottom left corner. Press the set button twice, and you’ll see a number 3 in the bottom left corner. If your electric bike has 28-inch tires, the number on this screen will read 28. You can toggle between all the sizes by pressing the minus [-] button. Hold “SET” again for two seconds to exit the setup interface.
Set 4 – MPH or KPH
Again, if your electric bike was purchased in Canada, the LCD console will already be set to kilometres per hour. To change between MPH and KPH, power on the LCD screen and hold the “SET” button for two seconds. The screen will become backlit (release the button at this point) and you’ll see the number 1 in the bottom left corner. Press the set button three times and you’ll see a number 4 in the bottom left corner. To toggle between MPH and KPH, press the plus [+] or minus [-] button. You can also use this function to determine whether you’re eligible to receive Mile Marker pins. (Check about this with your local Pedego store!) Hold “SET” again for two seconds to exit the setup interface.
Certain Pedego electric bikes also have the following settings:
Set 5 – Pedal Assist Limiter
To engage the pedal assist limiter, or to turn it off, power on the LCD screen and hold the “SET” button for two seconds. The screen will become backlit (release the button at this point). Press the set button four times, and you’ll see a number 5 in the bottom left corner. When the pedal assist limiter is set to “OFF,” you’ll have a reduced top speed through all pedal assist modes. Toggle between “OFF” and “ON” by pressing the plus [+] or minus [-] buttons. Hold “SET” again for two seconds to exit the setup interface.
Set 6 – Throttle Limiter
To engage the throttle limiter, or to turn it off, power on the LCD screen and hold the “SET” button for two seconds. The screen will become backlit (release the button at this point). Press the set button five times, and you’ll see a number 6 in the bottom left corner. When the throttle limiter is set to “OFF,” you’ll have a regulated throttle output to about walking speed. Toggle between “OFF” and “ON” by pressing the plus [+] or minus [-] buttons. Hold “SET” again for two seconds to exit the setup interface.
Once you’ve completed working in the set screens, press and hold “Set” for two seconds to exit the setup interface and return to the initial screen.
The LCD console also has a USB port embedded in the underside of the LCD console that allows you to charge your mobile devices. To activate the USB charger, press the plus [+] button and the SET button at the same time for 2 seconds. This will turn on the USB charging capability. Hold the same buttons again for 2 seconds to turn this feature off.
CONTACT A LOCAL PEDEGO STORE TO LEARN MORE.
"*" indicates required fields


